Adapted under a CC-BY 4.0 license from the The 30-Day Impact Challenge: The Ultimate Guide to Raising the Profile of Your Research eBook published by Impactstory.org and authored by Stacy Konkiel.

This work is licensed under a Creative Commons Attribution 4.0 International License.
Google has likely already been indexing your work for some time now as part of their mission as a scholarly search engine. However, keep in mind that Google Scholar does not index everything.
Google Scholar will provide you with a list of publications they think belong to you. You’ll need to read through the list of publications that it suggests as yours and select which ones you want to add to your profile.
If you do not have any publications, Google Scholar will still present you with some options for publications that, based on your name, could belong to you. Unfortunately, in order to move forward with the process, you will have to accept one of these and then later remove it from your profile.
Beware--if you have a common name, it’s likely there’s some publications in this list that don’t belong to you. And there’s also possibly content that you don’t want on your profile because it’s not a scholarly article, or is not representative of your current research path, and so on.
Read through the publications list and deselect any that you do not want to add to your profile (like the below newsletter item that Google Scholar thinks is a scholarly article).
Click the grey “Add” button at the top of your profile.

Confirm you want Google to automatically add new publications to your profile in the future. If you’ve got a very common name, note that this might add publications you didn’t author to your profile. But if you’re a prolific author, it can be worth it for the time it saves you approving new articles every month.
Your profile is now almost complete! Two more steps: add a photo by clicking the “Change Photo” link on your profile homepage, and set your private profile to “Public.”
Your profile is private if you’ve just created it. Change your profile visibility by clicking the link to "Make it public" under your name and title. You can also make your profile public by clicking the Edit button and selecting the box next to the words "Make my profile public."
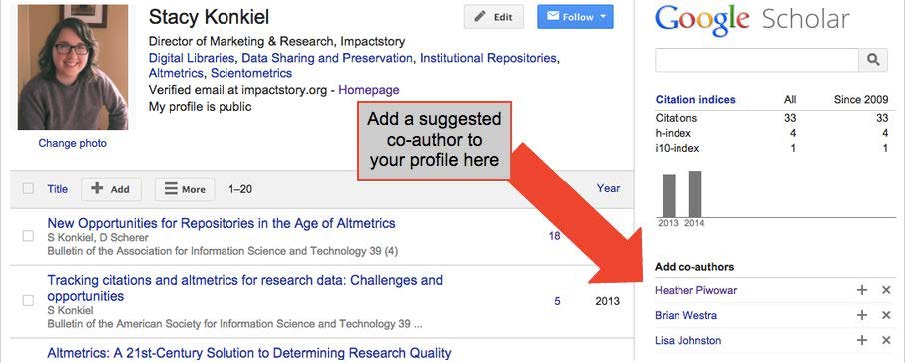
Adding co-authors is a good way to let others know you’re now on Google Scholar. However, you can only add co-authors who have already created their own Google Scholar profiles. Google Scholar tries to find authors who have user profiles and list them for you. Thus, if you don’t see co-authors, it’s likely they don’t have Google Scholar user profiles.
To add a suggested co-author, find the “Co-authors” section on the top right-hand section of your profile, and then click the plus-sign next to each co- author you want to add.
That’s it! Now you’ve got a Google Scholar profile that helps you track when your work has been cited both in the peer-reviewed literature- and it's yet another scholarly landing page that connects others with your publications. The best part? Google Scholar is pretty good at automatically adding new stuff to your profile, meaning you won’t have to do a lot of work to maintain it.
You might have articles that Google Scholar didn’t automatically add to your profile. If that’s the case, you’ll need to add it manually.
Click the “Add” button in the grey toolbar within your profile.

On the next page, click the “Add article manually” link in the left-hand toolbar. Then you’ll see this screen:
Go ahead and add a new paper to your profile. Include as much descriptive information as possible--it makes it easier for Google Scholar to find citations to your work.
Click “Save” after you’ve finished adding your article metadata, and repeat as necessary until all of your publications are on Google Scholar.
Thanks to Google Scholar Profiles’ “auto add” functionality, your Profile might include some articles you didn’t author.
If that’s the case, you can remove them in one of two ways:
If you want to prevent incorrect articles from appearing on your profile in the first place, you can change your Profile settings to require Google Scholar to email you for approval before adding anything. To make this change:
From your main Profile page, click the “More” drop-down menu that appears in the top grey bar:

Prefer to roll the dice? You can keep a close eye on what articles are automatically added to your profile by signing up for alerts and manually removing any incorrect additions that appear. Here’s how to sign up for alerts: click the blue “Follow” button at the top of your profile, select “Follow new articles,” enter your email address, and click “Create alert.”


